Graphic User Interface GuideThe system provides powerful interface controls to give you a profesional desktop-like working experience.
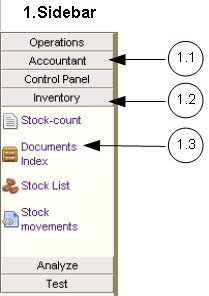  |
1. Sidebar menu.
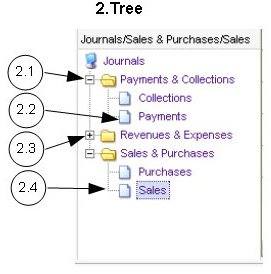
Use this menu to open various pages of the application. 1.1. Menu group button - closed. Click here to open the menu group. 1.2. Menu group button - open. 1.3. Page or operation link. Click here to open the page. 2. Data tree control. Use this control to select data to view. 8 2.1. Open branch. Click on the 'minus' sign on its left to close it. 2.2. Treee Node. Click on it to select a tree node. 2.3. Closed branch. Click on the 'plus' sign on its left to open it. 2.4. Selected tree node. |
 | |
|
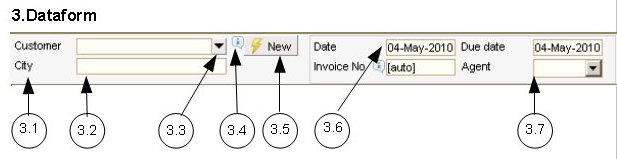
3. Data form control.
This control is used to view or fill-in form data. 3.1. Field label caption. 3.2. Field text box. Type your text here. 3.3. Dropdown (look-up) button for a field that allows both look-up selection aand keyboarrd input. Press this buttton to open a multi-column dropdown list (look-up list). This will open a table with data to select for the text field. The dropdown list can also be opened by pressing F4 while thee cursor is in that field (feature not available in Internet Explorer). 3.4. Field tooltip. Move your mouse pointer overr tthis and you will see indications on how to fill that field. 3.5. Command buttton. Press it to perform varrious tasks, as described on its tooltip. 3.6. Date field. Here you can enter a date from the keyboard, or you can call the graphic calendar to select a date. If you want to type from the keyboard, you can enter the date in different ways. For instance, to input '17-May-2010', you can type:'17-May-2010', '17-05-2010', '17-05-10', '17-5-10', '17/05/10', '17.5.10'. If you want to open a calendar to select a date, you can click oncce on the date field label caption, or double-click on the date field text box. 3.7. Simple look-up list, single-column. This field only allows selectting from the list, doesn't allow keyboard input. Some browsers such as Firefox allow keyboard search in the list, if you type fast. | |
 | |
|
4. Data grid control.
Use this control to view , update or append tabular data. You can click on the column headers to sort the data ascending or descending by the respective column. 4.1. Grid title 4.2. Grid pagination control. This is only visible when you have a large amount of data loaded in the datagrid, usually more than 500 recrds. 4.3. Search and filter field selector. Select from this list the field you want to search or filter. 4.4. Search and filter text box. Type here the text you want to search or filter. You can use the '%' as a place holder for any character. The data will be searched as you type. If you press Enter, the first occurence will be located. To locate the next occurrence press arrow down. To filter the data, type your filter here then click on the funnel icon next to this textbox. To remove your filter, click the funnel icon with this textbox empty. 4.5. Autosize button. Click this to set the widths of th columns to match the widths of the text. If you have many columns, this operation can take a few seconds. 4.6. Copy and paste button. Click this button to copy the data from the grid to a TAB-separated text that you can paste on a spreadsheet or another datagrid. You can also import data into the datagrid, from a TAB-separated text that you have in your clipboard, from another grid or program, such as a spreadsheet. 4.7. Delete button. Click this button to delete the selected rows from the datagrid. Read 4.14. to find out how to select multiple rows. If there is only one selected row, you can also delete it by pressing 'Delete' key, after you click on the row label (4.14.). 4.8. Refresh button. Click this button if you want to re-load the data from the server. This will undo all the unsaved changes you made to the data. 4.9. Save button. Click this to submit your changes to the server. Unless you press this button, your data will not be saved to the server. Some pages control the data saving to the server with different buttons, such as Finish or Save button, and it is not necessary to click the grid save button. However, since the data you add or change in the data grid is never automatically saved until you finish your work, you should click the grid save button from time to time, if you have a lot of data to add or update. 4.10. Grid dropdown, open. This is a multi-column look-up list to choose from when you add or update data in the grid. A dropdown is in fact another datagrid, which can have most of the features of a stand-alone datagrid, such as search, sort and filter. If you press ESC while the dropdown is open, it will close without updating your grid data from the dropdown. If you press Enter while the dropdown is open, or click on the dropdown, it will close and update your grid data from the dropdown. If you press ESC during grid cell editing, without any dropdown open, it will undo your last update of that cell. 4.11. Grid dropdown button. Click this button to open the dropdown for the respective column. You can also press F4 to open and close the dropdown, except for Internet Explorer and Opera 4.12. Dropdown resize handle. Click and drag this handle to resize your dropdown. 4.13. Grid column tooltip. This gives you information on how to enter the data in that column, or what is the meaning of that column. 4.14. Grid row label. Click on this label to select the row. This also shows the row number. To select multiple rows, click on one row label with CTRL key pressed, then click on another row label while holding the CTRL key. All rows between them will be selected. 4.15. All rows selector. Click this area to select all the rows in the datagrid. 4.16. Add new row. To append one row to the datagrid, fill-in the data in this row. The add ne row will always be the last row of the datagrid, if it allows adding rows. 4.17. The currently selected row. | |
Business Process AutomationData Security in the CloudIndustriesERPWMSManufacturingRetaile-CommerceWhy Cloud Computing ?
What our customers are saying
PartnersFor AccountantsInventory Control via API for eCommerce“BWYS is manufacturing sheet metal products and supplies scaffoldings. In the last 4 years since we migrated from SAP to ExpertAccounts, we mostly appreciate the quality of service... - BWYS Group Berhad
“Finally! I found ExpertAccounts... fantastic application... excellent customer support ... I have found the system to run my business into the future. - Schneider Sales and Marketing
“We selected ExpertAccounts mainly because it can handle multi-currency issues as well as automatic foreign exchange functions...provides us with customized solution which fit our operations requirements of multiple approval levels - Don Sahong Power Company Ltd
“...9 years since we are using ExpertAccounts for our manufacturing, we appreciate the flexibility, compared to our previous Microsoft solution. Action Industries designs, manufactures and assembles audio / video entertainment multimedia products. - Action Industries (M) Sdn Bhd
“It helps us a lot that we have everything in one place for every project: from the quote and the technical sheets with the necessary materials, sub-assemblies and consumption differences, to the invoicing - IPTE Ro
“With ExpertAccounts, it's easier to manage the group of companies consolidated accounts. - Desa Murni
“ExpertAccounts never gave me any major issue since I switched... All my outlets are under our control and we know their status anytime anywhere. - Mobile Star Communication
“...better than previous software because of the modern integration features, ease of use, and enhanced security - A-Sashi Technology Sdn Bhd
More...