ExpertAccounts Admin Panel Manual

Summary
Admin Panel Log In
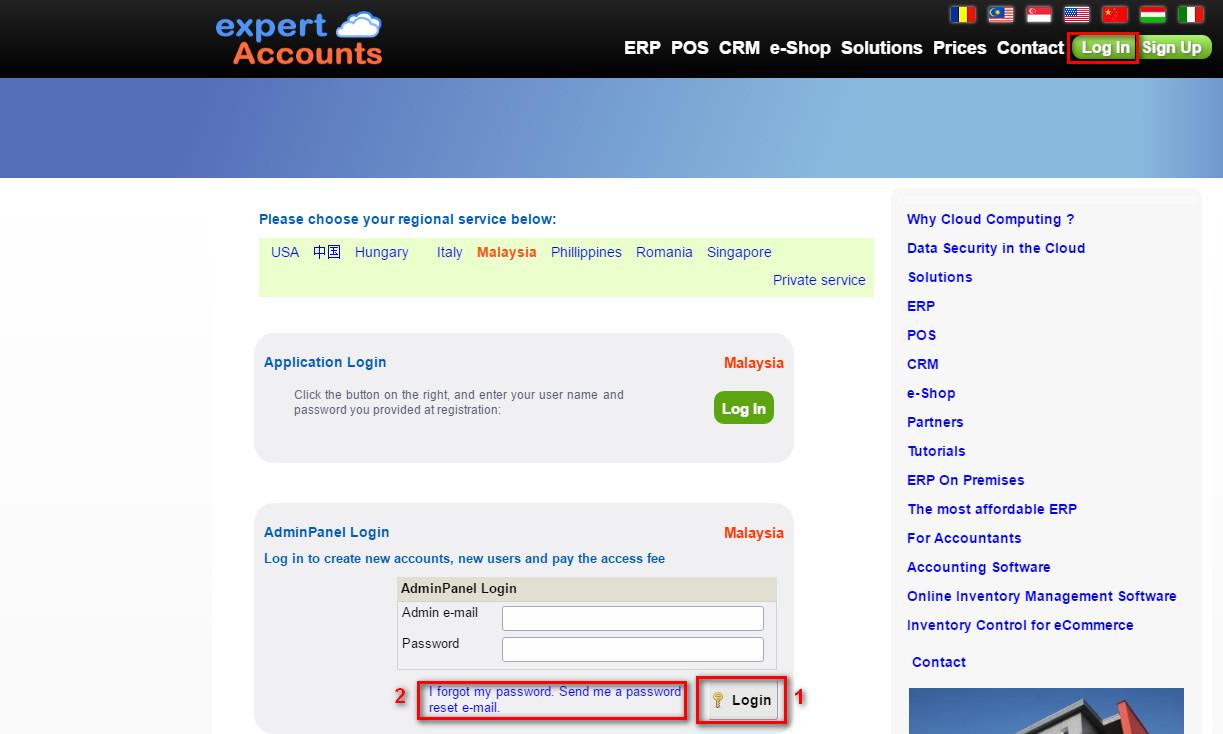
To log into ExpertAccounts Admin Panel, go to the expertAccounts website (https://expertaccounts.com/) and click the Log In button (see the picture below).At AdminPanel Login section, enter your email and password you chose when you signed-up to ExpertAccounts, then click the Login button (see 1).
If you have forgotten your password, enter your email in the field AdminPanel e-mail and click the link Send me a password reset e-mail (see 2).
Update Account Details
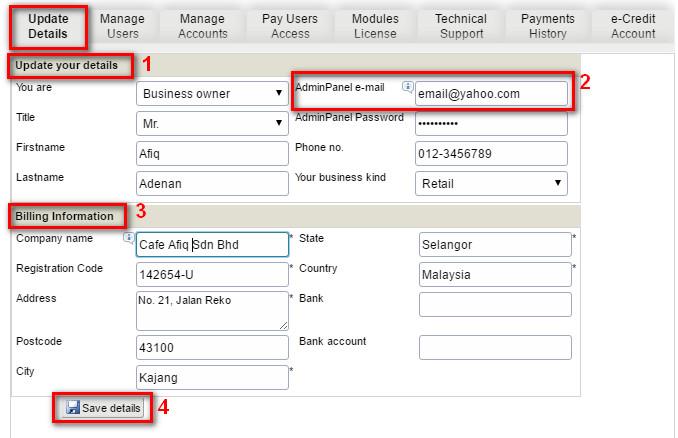
The Update Details tab is where you enter information of the account holder (see 1) as well as Billing Information (see 3).In the AdminPanel e-mail field (see 2) insert the email address you use to connect to the AdminPanel.
Remember to press the Save details button after any changes (see 4).
User Management
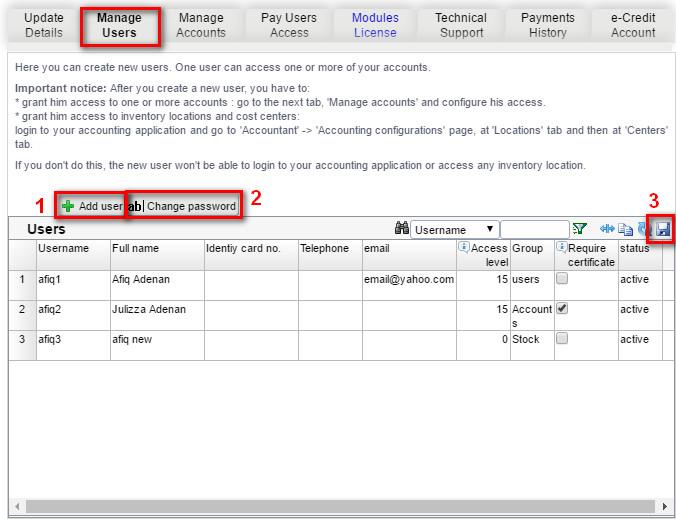
User management is done from the Manage Users tab (see the picture below).To add a new user, click on the Add User button (see 1).
To change an existing user password, select the user in the table and click the Change Password button (see 2).
Other changes can also be made here. For example, change your e-mail address by clicking the cell is located, delete the old address, insert the new one, and then press the Save button.
Remember that after any change to press the Save button (see 3).
Accounts Management
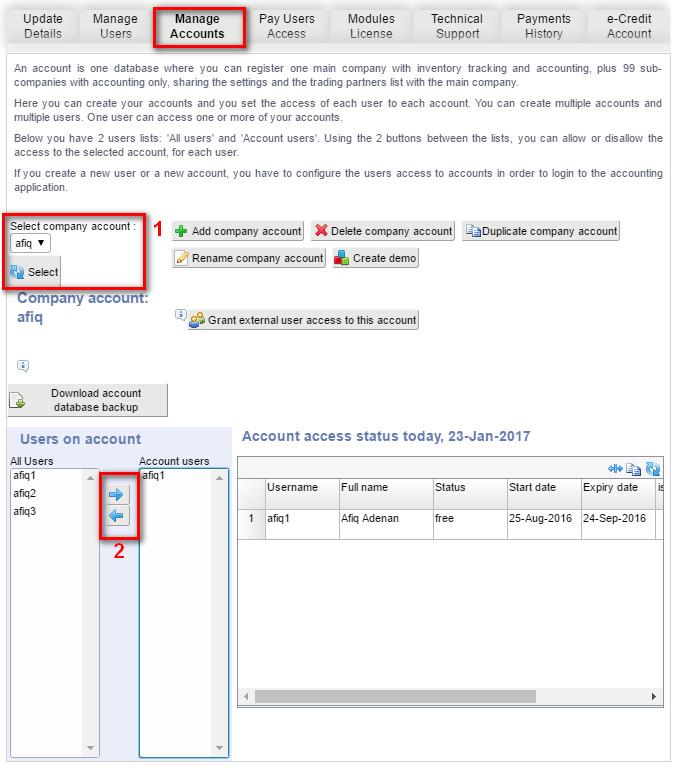
In the Manage Accounts tab you can:- Add company account
- Delete company account
- Duplicate company account
- Re-name company accounts
- Create Demo account
- Grant external user access to your account
- Download account database back-up
- Grant or remove user access
- Step 1: Select your company account you want from the list, then click the Select button (see 1)
- Step 2: click on the desired user in the column All Users and click the blue arrow pointing to the right to grant access and the one pointing to the left to remove access (see 2)
Pay Users Access
Users Access payment can be made in the Pay Users Access
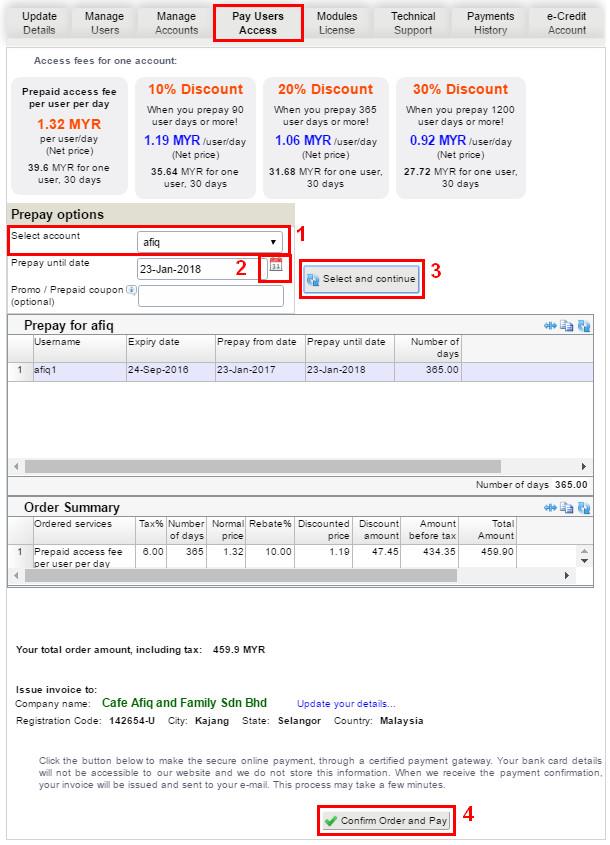
- Step 1: Select account (see 1)
- Step 2: Choose until which date you wish to pay by clicking on the calendar (see 2). Don't forget that the minimum is 30 days.
- Step 3: Press the Select and continue button (see 3). After pressing this button, it will appear the users you are paying for, expiry date, number of days, order summary etc.
- Step 4: Press the Confirm Order and Pay button(see 4) → If you don't have available e-credit, a page will open where you pay by card (no need to be company's card, you can pay with any credit card, as the invoice is automatically generated with the information you entered in the Billing Information section)
→ If you have available e-credit, the payment will be made from it (for more information on e-credits, see How to use e-Credit)
Pay Modules Licenses
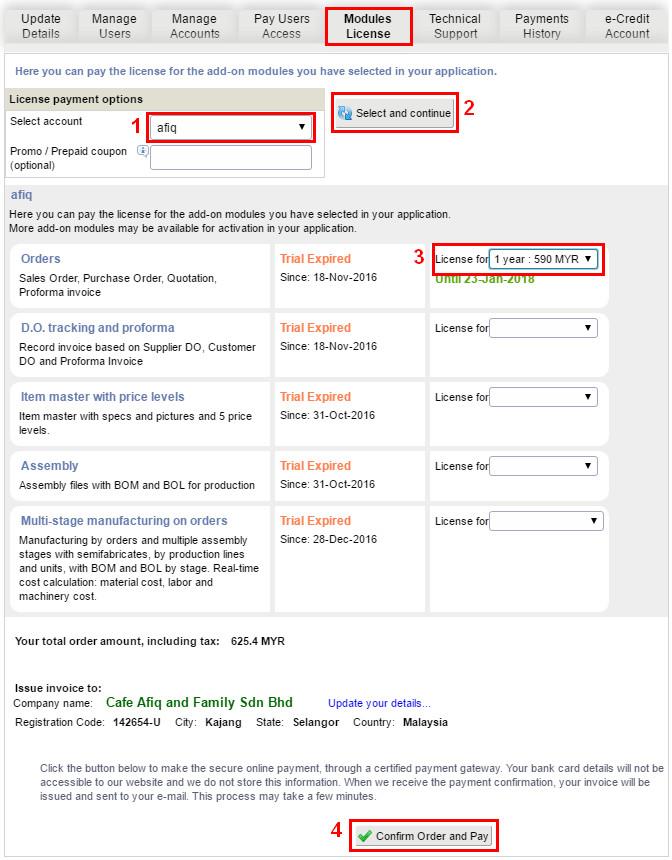
To pay an add-on module's license, click on the Modules License tab.
Select the account (see 1), click the Select and continue button (see 2).
Below you will see all the add-on modules you have selected in your application. Select from the list the ones you want to pay (see 3). To finish, click the button Confirm Order and Pay(see 4).
→ If you do not have available e-credits, a page will be open where you pay by card (no need to be card company, you can pay with any credit card, as the invoice is automatically generated with the information you entered in theBilling Information)
→ If you have available e-credits, payment will be made from it (for more information on e-credits, seeHow to use e-Credit)
Pay Technical Support
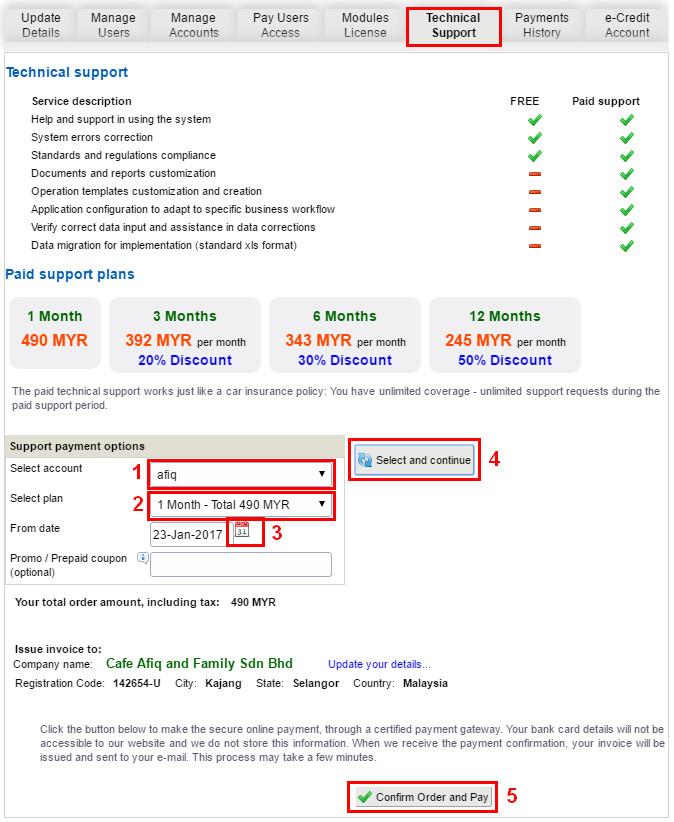
To enable paid technical support, click on theTechnical Support tab.
Select the account (see 1), choose from the list (see 2) and choose the date you want to start paid technical support by clicking on the calendar (see 3). Press Select and continue (see 4).
Below is a summary of the order. To finish, press the Confirm Order and Pay (see 5).
Select the account (see 1), choose from the list (see 2) and choose the date you want to start paid technical support by clicking on the calendar (see 3). Press Select and continue (see 4).
Below is a summary of the order. To finish, press the Confirm Order and Pay (see 5).
Payments History and Download Invoices
The application allows you to view all the payments you've made in expertAccounts and download invoices.
Click on the Payment History taband select the account (see 1). Choose Payments history (the first table) then press Download invoice (see 2).
Click on the Payment History taband select the account (see 1). Choose Payments history (the first table) then press Download invoice (see 2).
How to use e-Credit
To use your e-Credit, click on thee-Credit Account tab.
E-credit is like a virtual wallet, credit or prepaid mobile phone. Load balance through bank payment to expertAccounts.com. Then, you can use your e-credit balance (instead of paying by credit card) to pay for user access, add-on modules licenses and paid technical support. You can also transfer your balance to another account owner.
On first use, it is necessary to press Create my account e-Credit. After pressing the button, you can see more information:
To purchase e-credits, enter the desired amount inReload your e-Credit (see 3) and then click the Confirmand issue invoice button(see 4). Look for the confirmation message that the invoice was sent. This will automatically be sent to your e-mail (the one you wrote in Update Details).
To transfer e-credits, use Transfer e-Credit to another account (see 5). Enter the recipient's account and the amount you want to transfer. Press the Confirm credittransfer (see 6).
E-credit is like a virtual wallet, credit or prepaid mobile phone. Load balance through bank payment to expertAccounts.com. Then, you can use your e-credit balance (instead of paying by credit card) to pay for user access, add-on modules licenses and paid technical support. You can also transfer your balance to another account owner.
On first use, it is necessary to press Create my account e-Credit. After pressing the button, you can see more information:
- E-Credit Account Code (see 1) is a unique code assigned to your account, used to transfer e-credits
- Balance (see 2):available e-credit
To purchase e-credits, enter the desired amount inReload your e-Credit (see 3) and then click the Confirmand issue invoice button(see 4). Look for the confirmation message that the invoice was sent. This will automatically be sent to your e-mail (the one you wrote in Update Details).
To transfer e-credits, use Transfer e-Credit to another account (see 5). Enter the recipient's account and the amount you want to transfer. Press the Confirm credittransfer (see 6).
Business Process AutomationData Security in the CloudIndustriesERPWMSManufacturingRetaile-CommerceWhy Cloud Computing ?
What our customers are saying
PartnersFor AccountantsInventory Control via API for eCommerce“BWYS is manufacturing sheet metal products and supplies scaffoldings. In the last 4 years since we migrated from SAP to ExpertAccounts, we mostly appreciate the quality of service... - BWYS Group Berhad
“Finally! I found ExpertAccounts... fantastic application... excellent customer support ... I have found the system to run my business into the future. - Schneider Sales and Marketing
“We selected ExpertAccounts mainly because it can handle multi-currency issues as well as automatic foreign exchange functions...provides us with customized solution which fit our operations requirements of multiple approval levels - Don Sahong Power Company Ltd
“...9 years since we are using ExpertAccounts for our manufacturing, we appreciate the flexibility, compared to our previous Microsoft solution. - Action Industries (M) Sdn Bhd
“We have everything in one place for every project: from the quote and the technical sheets with the necessary materials, sub-assemblies and consumption differences, to the invoicing - IPTE Ro
“...easy to manage the group of companies consolidated accounts. - Desa Murni
“ExpertAccounts never gave me any major issue since I switched... All my outlets are under our control anytime anywhere. - Mobile Star Communication
“...better than previous software because of the modern integration features, ease of use, and enhanced security - A-Sashi Technology Sdn Bhd
More...